Want to track user actions on your website while keeping your code clean? Combining Meta Pixel with Google Tag Manager (GTM) is the way to go. Here's the quick process:
- Set Up Meta Pixel: Get your Pixel ID from Meta Events Manager.
- Install GTM: Ensure your website has a working GTM container.
- Add Meta Pixel to GTM: Use the community template or custom HTML to integrate the Pixel base code.
- Track Events: Configure tags for actions like purchases or leads.
- Test Everything: Use GTM Preview mode and the Meta Pixel Helper extension to verify.
This setup simplifies tracking, avoids manual coding errors, and ensures your advertising data is accurate. Let’s dive into the details!
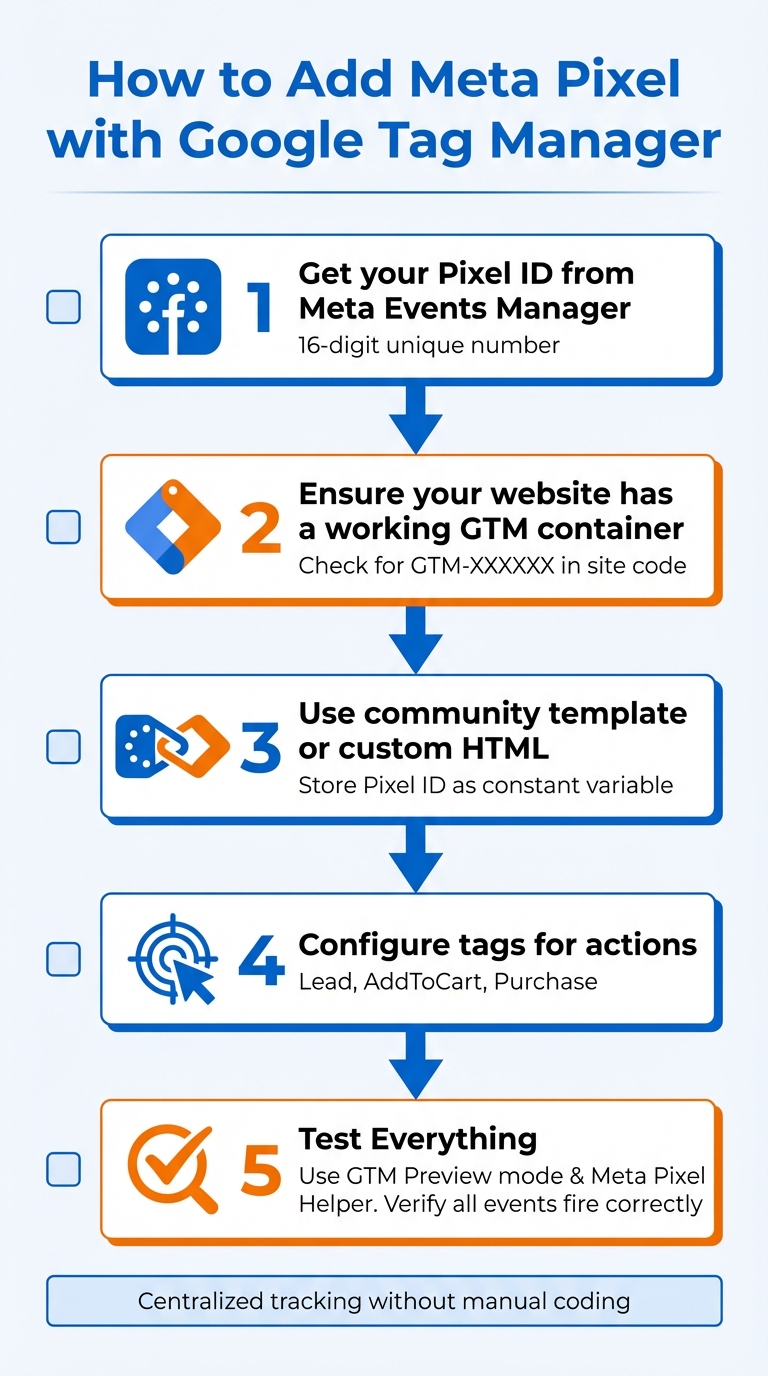
How to Add Meta Pixel with Google Tag Manager in 5 Steps
The Easiest Facebook Ads Pixel Tutorial (With GTM) | 2025 Step-by-Step Tutorial
sbb-itb-94eacf4
What You Need Before Starting
To integrate Meta Pixel with Google Tag Manager (GTM) effectively, it's crucial to have the right setup and permissions in place. This ensures the process runs smoothly and avoids potential issues. Here’s what you need to get started:
Access to Meta Events Manager and Google Tag Manager
First, make sure you have administrative access to both Meta and GTM platforms. In GTM, admin-level permissions let you create, configure, and publish tags within your website container. For Meta, you’ll need access to Meta Business Suite or Events Manager to create the pixel, retrieve the Pixel ID, and monitor event data. Specifically, a Meta Business Manager account is required to select "Web" as the data source when setting up a new pixel.
Once you’ve created your pixel, locate the Pixel ID in the Events Manager under the Settings or Overview tab. Save this ID as a constant variable in GTM. Before proceeding, check for any existing pixel installations using the Meta Pixel Helper Chrome extension. Duplicate pixels can lead to inaccurate metrics.
Avoid using Meta's "Partner Integration" option for GTM. This method gives Meta full control over your container, including the ability to edit, add, or delete tags, and it may publish changes without prior notice. Instead, opt for a manual installation or use a trusted community template to maintain control.
After confirming access and securing your Pixel ID, double-check that GTM is properly installed on your website.
Confirm Your Website Uses Google Tag Manager
Your website must already have a working GTM web container installed before adding the Meta Pixel. Look for the GTM snippet in the <head> section of your site and the corresponding noscript snippet immediately after the opening <body> tag.
To confirm the GTM installation, use the platform's Preview mode. In your GTM workspace, click "Preview", enter your website's URL, and verify that the Google Tag Assistant connects and opens a debug window. In the debug pane, check for the "Container Loaded" event in the left-hand summary - this indicates the GTM script is active on your site. Alternatively, you can manually inspect your site's source code (Ctrl+U or Right-click > View Page Source) and search for a script with a unique ID in the format "GTM-XXXXXX." Ensure this ID matches the one displayed in your GTM dashboard to avoid working in the wrong container.
If GTM isn’t detected, try disabling ad blockers or "Do Not Track" settings, or test in a private browsing window. This can help bypass potential issues that might interfere with the GTM script.
How to Add Meta Pixel with Google Tag Manager
Now that you've set up and verified your Google Tag Manager (GTM) installation, it's time to integrate the Meta Pixel. This involves three key steps: locating your Pixel ID, adding the base tracking code, and setting up event tags for detailed tracking.
Find Your Meta Pixel ID
The Meta Pixel ID is a unique 16-digit number that links your website's activity to Meta's tracking system. To find it, log in to Meta Business Suite, go to Events Manager > Data Sources, and locate the Pixel ID under your pixel name or in the Settings tab.
If you need to create a new pixel, click the green "Connect Data Sources" button, choose "Web", and then select "Meta Pixel". After naming your pixel and entering your website's URL, Meta will generate a new Pixel ID. Save this number - you'll use it throughout the setup process.
For quick validation, use the Meta Pixel Helper Chrome extension. This tool will display any active Pixel IDs on your website. Alternatively, if a Pixel tag already exists in GTM, check your workspace under Tags, open the Meta Pixel tag, and find the Pixel ID in the configuration. To simplify future updates, store your Pixel ID as a constant variable in GTM.
Add the Meta Pixel Base Code
You can add the Meta Pixel base code using either the community tag template (recommended) or a custom HTML tag. The community template minimizes coding errors and simplifies maintenance.
-
Using the Community Tag Template:
Go to Templates > Tag Templates > Search Gallery, find the Facebook Pixel template by facebookpixelarchive, and add it to your workspace. Create a new tag, input your Pixel ID, set the event to PageView, and apply the All Pages trigger. -
Using Custom HTML:
In Meta Events Manager, select Add Events > Install Code Manually, and copy the provided base code snippet. Then, in GTM, create a new tag of type Custom HTML, paste the code, and set the tag firing options to Once per page under Advanced Settings. Assign the All Pages trigger and save your changes.
Pro Tip: Save your Pixel ID as a constant variable in GTM. This way, if your Pixel ID changes later, you only need to update it in one place instead of editing multiple tags.
Once the base code is in place, you can move on to configuring event tracking.
Set Up Event Tracking Tags
With the base Pixel tag running, you can now track specific user interactions by setting up event tags. Standard events like Lead, AddToCart, and Purchase are predefined by Meta and help optimize your ad campaigns.
-
Creating Event Tags:
For each event, create a separate tag using either the community template or custom HTML. For example, to track leads, use the codefbq('track', 'Lead');. Assign each event tag to a corresponding GTM trigger, such as Page View for thank-you pages or Click for "Add to Cart" buttons. -
Including Additional Parameters:
Some events, like Purchase, require extra details like value and currency to measure ROI effectively. Use GTM's Data Layer Variables to dynamically pass this data. If your site uses GA4's e-commerce data layer, you can create custom JavaScript variables to reformat the data into Meta's required structure (e.g.,content_idsas an array of strings orcontentsas an array of objects). -
Fine-Tuning Pixel Behavior:
Disable "Automatic Data Detection" in the Meta Pixel tag settings to prevent the pixel from capturing unverified data. Also, ensure the Base Pixel tag fires before any event tags by using GTM's Tag Sequencing feature to control the firing order.
Testing Your Meta Pixel Setup
It's important to verify your Meta Pixel tags before going live to catch any errors and ensure your data flows as expected.
Test with GTM Preview Mode
Start by clicking the Preview button in the top-right corner of your Google Tag Manager (GTM) workspace. This launches Google Tag Assistant. Enter your website URL in the popup and hit Start to open a debug session in a new browser tab.
Once you're in the Tag Assistant event timeline, select the Container Loaded event. Navigate to the Tags tab to confirm your Meta Pixel tag appears under Tags Fired. Click on the fired tag to inspect its properties and verify the correct Pixel ID is being sent.
Switch the view to "Values" to see actual data, like the real price or product ID. If you're tracking eCommerce events, use the Variables tab to confirm that dynamic values (like product IDs or purchase totals) are being captured as intended.
Run tests for all critical conversion steps - homepage, product pages, add-to-cart, and checkout - to ensure events fire in the right sequence. If you make changes to tags in GTM, click Preview again to reload the updated container version. For accurate results, use Incognito mode to avoid interference from cached data or browser extensions.
Use Meta Pixel Helper to Verify
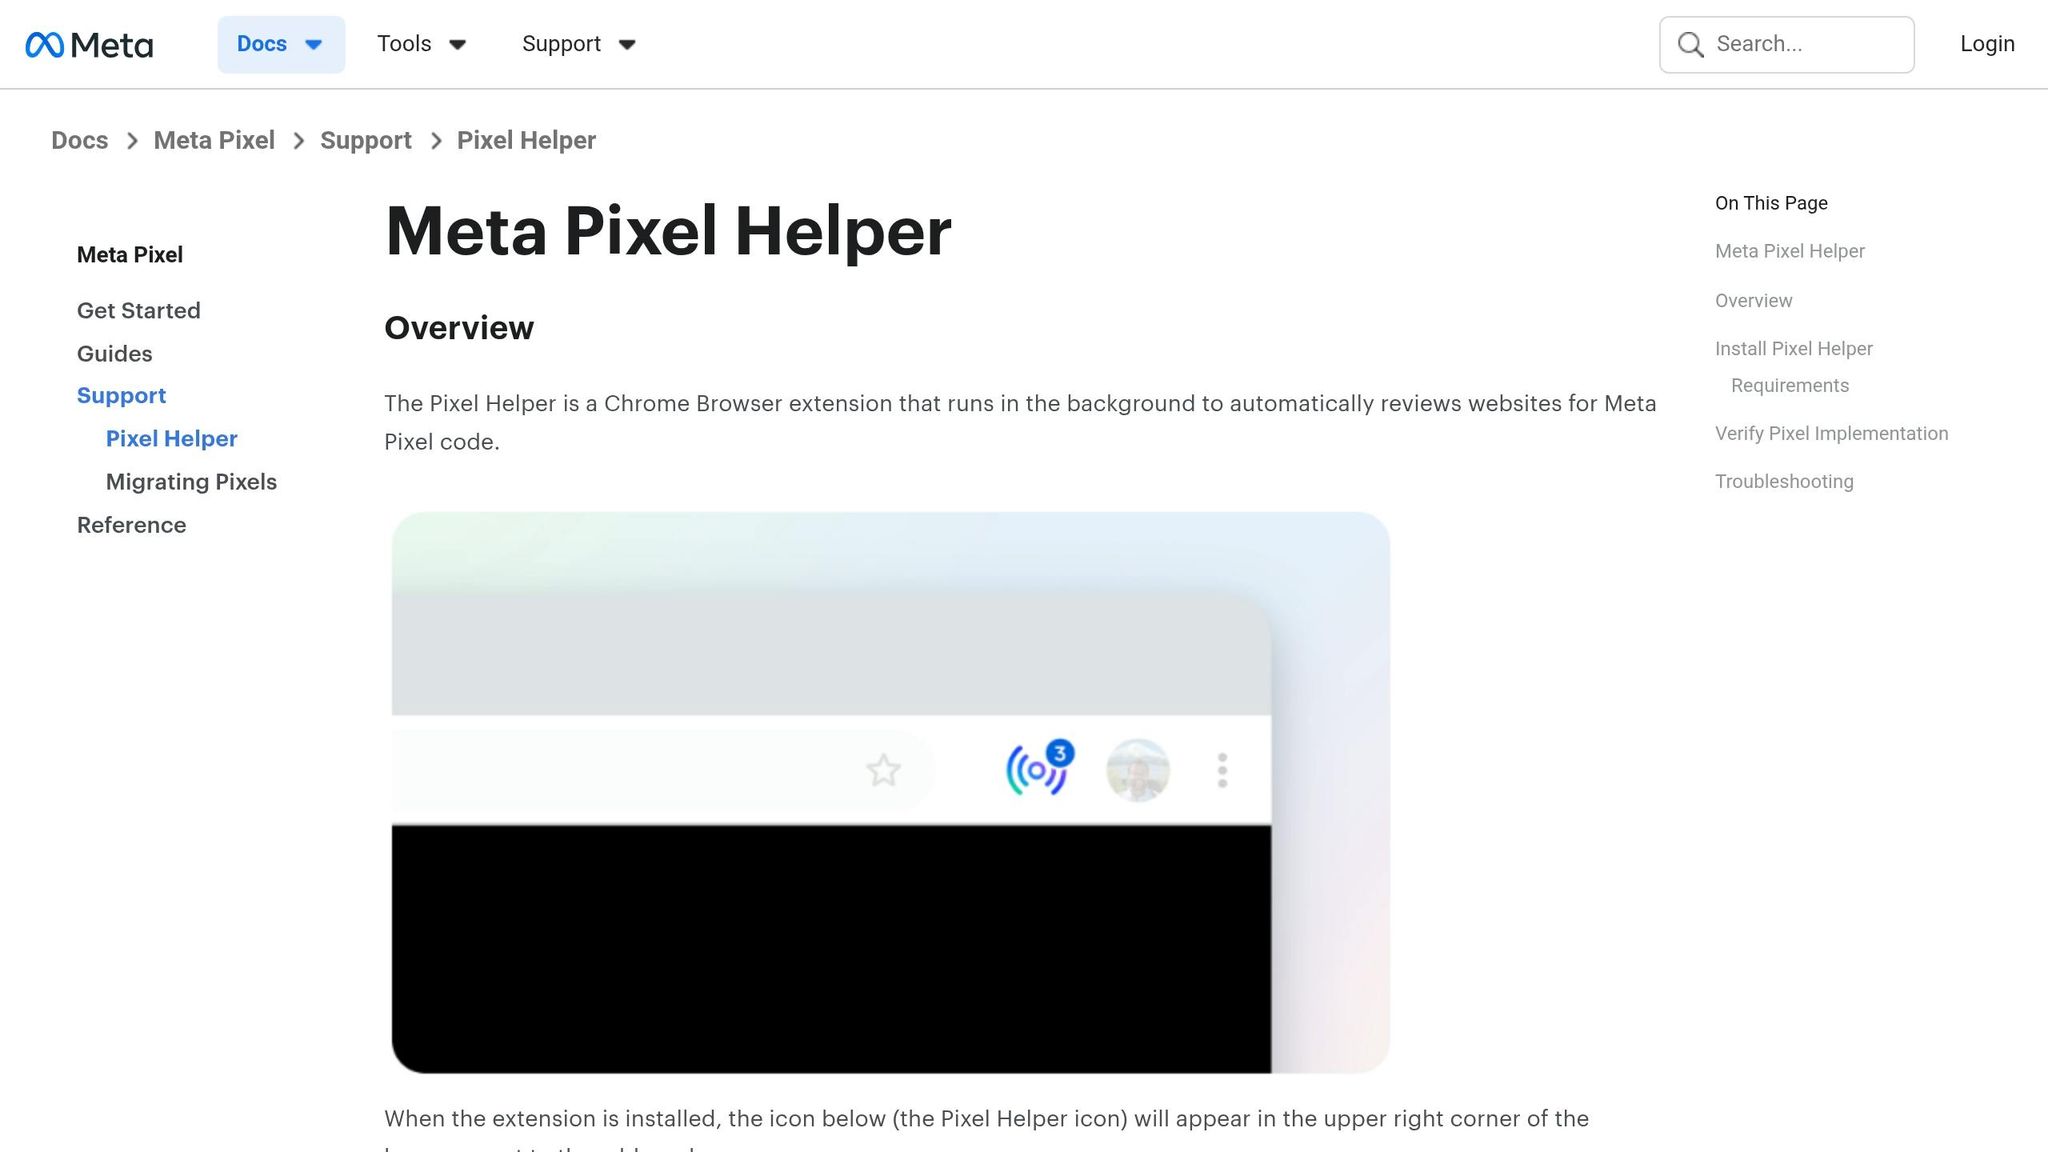
Install the Meta Pixel Helper Chrome extension, which has over 3 million users and a 4.1/5 rating on the Chrome Web Store. Pin it to your toolbar for easy access.
The extension icon changes color based on what it detects:
- A grey icon means no pixel was found.
- A blue icon with a number badge indicates the pixel is active and shows how many events fired.
- Clicking the icon provides more details:
- Green checkmarks confirm successful events.
- Yellow warnings highlight missing parameters.
- Red errors indicate critical failures.
| Pixel Helper Signal | Meaning | Recommended Action |
|---|---|---|
| Blue Icon with Number | Pixel detected and events fired | Click to verify event names like PageView. |
| Grey Icon | No Meta Pixel detected | Check if the GTM container is published or if the tag is blocked. |
| Red Error / Yellow Warning | Critical issue or optimization suggestion | Check for missing parameters like "value" or "currency." |
| Pixel Activated Multiple Times | Same ID and event name sent more than once | Look for duplicate tags in GTM or hardcoded scripts in your website's theme. |
Always ensure the Pixel ID detected by the helper matches the one in your Meta Events Manager. For eCommerce events like Purchase, confirm that required parameters are correct: the currency should be a three-letter code (e.g., USD), and the value should be numeric. Disable ad blockers or tracking protection during testing, as these can prevent the pixel from firing properly.
Once the Pixel Helper confirms your events, you can move on to verify data reception in Meta Events Manager.
Review Data in Meta Events Manager
Head to Meta Events Manager and open the Test Events tab for your pixel. Enter your website URL and perform key actions, like adding items to the cart or completing a purchase, to validate events in real-time. Events should show up in the log within seconds, with all parameters displayed.
Check the Pixel status in the Overview tab to ensure it shows as Active, confirming that Meta's servers are receiving the data. Review the entire conversion funnel systematically to ensure no steps are missed. If you're using the Conversions API alongside the browser pixel, verify deduplication by checking for shared event_id parameters in the event details.
For more advanced debugging, open your browser’s DevTools and filter network requests by "tr" or "facebook" to view event calls. If you’re using a Consent Management Platform, test both before and after granting consent to ensure the pixel only fires when it’s allowed to.
Troubleshooting Common Problems
Even with everything set up correctly, issues can still pop up when using Meta Pixel with Google Tag Manager (GTM). Here's how to tackle some of the most common problems.
Fix Duplicate Pixel Tracking
Duplicate tracking happens when your Meta Pixel fires multiple times for the same action. This can inflate conversion numbers and throw off your ad optimization. If you see warnings like "PageView - 2 events" or "Purchase - 2 events" in the Meta Pixel Helper, or errors like "Multiple events on an action" in the Diagnostics tab of Meta Events Manager, you might be dealing with this issue. Meta even flags "Redundant purchase events" when it detects four or more purchase events for a single transaction.
The usual culprit? Your Pixel ID might be installed in multiple places. For example, it could be hardcoded into your website's header (like in Shopify's theme.liquid or WordPress's header.php) while also being added as a GTM tag. Other causes include third-party apps sending pixel data, Meta's Automatic Events duplicating manual GTM tags, or both the Browser Pixel and Conversions API (CAPI) running without proper deduplication.
"The only Meta code that belongs in the header of your website is the Meta Pixel base code (which contains the page view event)." – Meta Business Help Center
To fix this:
- Stick to using GTM as the only method for tracking and remove any other installations of the Pixel.
- In GTM, adjust your Meta Pixel Base Code tag. Go to Advanced Settings and set the firing option to "Once per page" to avoid multiple triggers.
- Remove any hardcoded Pixel IDs from your theme files.
- Turn off Meta's automatic tracking in Events Manager.
- If you're using both Browser Pixel and CAPI, create a "Unique Event ID" variable in GTM. Add this shared
event_idto both browser and server tags so Meta can merge them into a single conversion.
| Cause of Duplication | How to Identify It | How to Fix It |
|---|---|---|
| Pixel + CAPI Overlap | Check deduplication percentage in Events Manager | Add a unique event_id to both sources |
| GTM & Manual Code Conflict | Meta Pixel Helper shows duplicate IDs | Remove hardcoded Pixel from theme files |
| Automatic Events Enabled | Diagnostics tab shows duplicate events | Disable automatic tracking in Meta settings |
| Event Code in Header | View page source or use Pixel Helper | Move event-specific code to confirmation pages |
Once you've handled duplicate tracking, it's time to ensure your events are sending accurate data.
Resolve Event Tracking Errors
Sometimes, events fire but don't send all the necessary data, which can undermine your ad campaigns. Missing parameters like value, currency, or content_ids are common and often result from misconfigured GTM variables or empty Data Layer fields. Another frequent issue is event name mismatches - Meta's naming conventions are case-sensitive, so even small errors can cause problems.
Keep an eye on the Diagnostics tab for errors like invalid currency codes or missing fields. For example, eCommerce events like "Purchase" should always include a numeric value and a three-letter currency code (e.g., USD). Use the Meta Pixel Helper to check if parameters are being passed correctly - green checkmarks mean success, while yellow warnings flag issues.
If an event fires on the wrong page (like a "Purchase" event triggering on the cart page instead of the confirmation page), review your GTM triggers to ensure they're targeting the right URLs or Data Layer events. Double-check that standard events use Meta's exact naming conventions (ViewContent, AddToCart, InitiateCheckout, Purchase) and that all required parameters are properly configured in GTM.
Prevent Integration Conflicts
Even after fixing duplicates and event errors, you might run into conflicts caused by other integrations. For instance, if both a native platform integration (like a Shopify or WordPress plugin) and GTM are firing events, this can create duplicate tracking that confuses Meta's algorithm.
To avoid this, choose one system to handle your tracking. If you're using GTM, remove any native Pixel installations or third-party plugins. Disable Meta's "Automatic Event Detection" in Events Manager if you're manually setting up events in GTM.
If you're using Custom HTML tags instead of the official Meta Pixel template, set up Tag Sequencing in GTM so the Base Code fires before event-specific tags. If a Consent Management Platform is in play, make sure it coordinates with your Meta Pixel tags to fire only after user consent is granted - this avoids privacy compliance issues.
Finally, always test your setup. Use Incognito Mode with ad blockers disabled to confirm your tracking reflects actual user behavior.
For step-by-step adjustments, refer to your GTM configuration and make sure everything aligns properly.
Conclusion
Setting up Meta Pixel through Google Tag Manager allows for centralized management of your tracking efforts. The process involves retrieving your Pixel ID from Meta Events Manager, creating a Constant Variable in GTM to store it, configuring the Base Code to fire on every page, and adding event-specific tags with the correct sequencing. Before publishing, always verify your setup using GTM Preview mode, the Meta Pixel Helper extension, and Meta's Test Events tool to ensure everything works as expected.
"Integrating via GTM helps centralize tags, makes updates easier without touching site code, and supports advertising optimisation by tracking user behaviour." – Meta Business Help
The real strength of this setup lies in its ability to track a broad range of user behaviors, from button clicks to video interactions, beyond basic page views. Additionally, pairing the Meta Conversions API (CAPI) with the browser pixel can help recover data lost due to ad blockers or iOS privacy updates.
Key Takeaways
- Use GTM's Community Template Gallery to simplify setup and minimize errors.
- Store your Pixel ID as a Constant Variable for easier updates.
- Trigger e-commerce events like "Purchase" through Data Layer events rather than URL-based triggers to avoid duplicate tracking caused by page reloads.
- For setups using both browser and server tracking, include a unique
event_idwith each signal to allow Meta to deduplicate events properly.
Remove any hardcoded Meta Pixel snippets from your theme files once GTM is live to prevent inflated conversion counts. Disable automatic configuration to avoid collecting unnecessary data. Testing is crucial before going live, and GTM's versioning system offers a safety net, allowing you to revert changes if needed.
Additional Resources
Looking to enhance your site's tracking and overall functionality? Check out Top Website Builders for a curated list of website building tools. Whether you're after AI-powered solutions, no-code platforms, or eCommerce options, the right builder can simplify the integration of tools like GTM and Meta Pixel, even without a dedicated developer.
FAQs
Should I use the GTM community template or Custom HTML for Meta Pixel?
When setting up the Meta Pixel (formerly Facebook Pixel) in Google Tag Manager, it’s best to use the pre-built Meta Pixel template rather than a Custom HTML tag. Why? Templates are designed to simplify the process, minimize mistakes, and make the setup more straightforward - perfect for those who might not be tech-savvy. While using Custom HTML is still an option, the template stands out for its ease and quicker implementation.
How do I stop Meta Pixel events from firing twice in GTM?
To stop Meta Pixel events from firing twice in Google Tag Manager (GTM), you can use deduplication techniques. This involves ensuring the event_id is identical for both client-side (Pixel) and server-side (Conversions API) events.
Additionally, review your GTM setup for overlapping triggers or incorrectly configured tags that might cause duplicate firing. Use the Test Events tab in Meta Events Manager to monitor and verify how events behave. A well-structured setup will help you avoid duplicate events and maintain accurate tracking data.
How can I pass purchase value and currency dynamically to Meta Pixel?
To dynamically send purchase value and currency to Meta Pixel, you’ll use the fbq('track', 'Purchase', {...}) function. This function should include variables that represent the transaction amount and currency.
If you're using Google Tag Manager (GTM), start by setting up variables or a dataLayer to capture the transaction data. Then, configure your GTM tags to pass this information dynamically to Meta Pixel. Double-check that these variables are properly connected to your website's transaction data to ensure precise tracking.