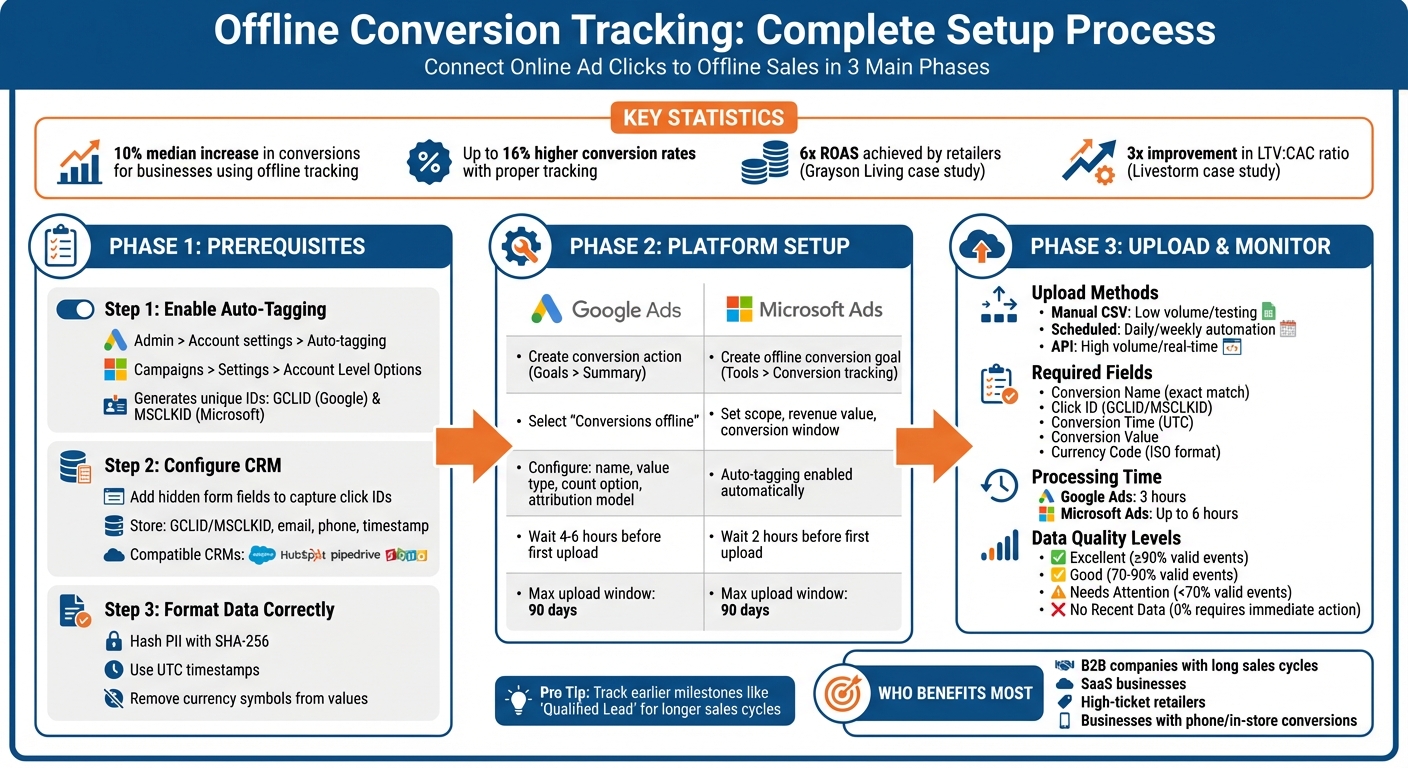
Offline conversion tracking links online ad clicks to offline outcomes, like phone calls, store visits, or CRM-recorded sales. This ensures ad platforms attribute conversions accurately, improving campaign performance and return on ad spend (ROAS). Here's a quick overview of the process:
- How It Works: Ad clicks generate unique IDs (e.g., GCLID for Google Ads, MSCLKID for Microsoft Ads). These IDs are stored in your CRM and uploaded back to ad platforms after offline conversions occur.
- Why It Matters: Without offline tracking, platforms optimize for actions like form submissions, which may not lead to revenue. Tracking offline conversions ensures better budget allocation and higher conversion rates - up to 16% in some cases.
- Key Benefits: Businesses using offline tracking report a 10% median increase in conversions and improved metrics like ROAS and customer lifetime value (LTV).
- Who Benefits Most: Companies with long sales cycles (e.g., B2B, SaaS, high-ticket retailers) gain the most from connecting offline actions to online ads.
To get started:
- Enable auto-tagging in Google Ads and Microsoft Ads to track click IDs.
- Configure your CRM to store these IDs alongside lead details.
- Format and upload offline conversion data (with click IDs) to ad platforms.
Keep reading for detailed steps to set up offline conversion tracking for Google Ads and Microsoft Ads, including data requirements, upload methods, and troubleshooting tips.
Offline Conversion Tracking Setup Process for Google Ads and Microsoft Ads
Google Ads offline conversion tracking: Setup + automation (w/ Patrick Sam)
sbb-itb-94eacf4
Prerequisites for Setup
Before integrating offline conversion data, make sure your ad platforms and CRM are set up to capture the necessary click IDs. This ensures you can track offline sales back to the original ad click. Additionally, enable auto-tagging to automatically add click identifiers to your URLs.
Enable Auto-Tagging
Auto-tagging is crucial for tracking offline conversions. It appends unique click identifiers - GCLID for Google Ads and MSCLKID for Microsoft Ads - to your landing page URLs.
- In Google Ads: Navigate to Admin > Account settings > Auto-tagging, then check the box labeled "Tag the URL that people click through from my ad."
- In Microsoft Ads: Go to Campaigns > Settings > Account Level Options, and toggle on "Auto-tagging of Click ID."
"Auto-tagging is also required for businesses that want to track offline conversions, such as sales that happened at your physical shop because of your online advertising." – Google Ads Help
Pro Tip: If your website uses URL redirects, make sure these click IDs (GCLID or MSCLKID) are preserved when the landing page forwards to another URL. This step is essential for accurate tracking.
Prepare Your CRM for Data Collection
Your CRM should be configured to capture click IDs directly from the landing page URL and associate them with each lead. To do this, include hidden form fields on your landing pages. These fields will automatically capture and store the GCLID or MSCLKID when a visitor submits a form.
Popular CRMs like Salesforce, HubSpot, Pipedrive, and Zoho support this feature. Additionally, ensure your CRM records the conversion timestamp in a consistent format and stores key user identifiers, such as email addresses or phone numbers. For Google’s Enhanced Conversions for Leads, email addresses are often the most reliable identifier due to fewer formatting issues.
If your users browse multiple pages before converting, third-party tools like Attributer can help ensure click IDs are captured accurately.
Data Formatting Requirements
To process offline conversions, ad platforms require specific data fields in a precise format. Both Google Ads and Microsoft Ads need the following:
- Conversion Name: Must exactly match the conversion action name in your account.
- Conversion Time: Use UTC to avoid timezone conflicts, though some platforms accept local time with an offset.
- Conversion Value: Enter numeric values only (omit currency symbols).
- Currency Code: Use the three-letter ISO code, such as USD, EUR, or GBP.
For Enhanced Conversions, user data must be hashed using the SHA-256 algorithm before uploading. Email addresses should be converted to lowercase, and extra spaces should be removed prior to hashing. Phone numbers must comply with the E.164 standard (e.g., +14155153679), including the plus sign and country code, without spaces, dashes, or parentheses.
| Platform | Click ID | Max Upload Window | Required Fields |
|---|---|---|---|
| Google Ads | GCLID | 90 Days | Conversion Name, Time, Value, Currency |
| Microsoft Ads | MSCLKID | 180 Days | Conversion Name, Time, Value, Currency, Account ID |
Timing Matters: After setting up a new conversion action in Google Ads, wait 4–6 hours before uploading your first batch of conversions. For Microsoft Advertising, allow at least 2 hours after creating a conversion goal. These waiting periods help ensure your offline conversion uploads proceed without issues in the next steps.
Setting Up Offline Conversions in Google Ads
This section walks you through the steps to set up offline conversions in Google Ads. The process involves creating a conversion action, fine-tuning its settings, and enabling enhanced conversions for better attribution accuracy.
Create a Conversion Action
Start by logging into your Google Ads account. Navigate to the Goals menu, select Summary, and click + Create conversion action. From the options provided, choose Conversions offline. Then, select your data source, which could be a direct connection, a third-party tool like Zapier, a partner integration, or CRM/file uploads.
Next, define the action by selecting a category that aligns with your goals, such as Qualified lead or Converted lead. Make sure to select Track conversions from clicks to properly attribute conversions to ad interactions.
Configure Conversion Settings
Once the action is created, configure its settings carefully:
- Conversion Name: Ensure the name matches exactly with your upload files, including capitalization.
- Value Type: Decide between a fixed value (a consistent dollar amount for all conversions) or a dynamic value (variable amounts based on CRM data).
- Count Option: Choose Every to count multiple conversions from a single user or One to count only the first conversion per click.
- Attribution Model: Select how credit is distributed across touchpoints (e.g., last click, linear, etc.).
- Conversion Window: Define the timeframe for tracking conversions, which can be up to 90 days for offline actions.
These settings ensure that offline conversions are properly linked to the corresponding ad clicks. Keep in mind that it may take 4–6 hours after creation before you can begin uploading conversion data.
Enable Enhanced Conversions
To boost match rates and improve attribution accuracy, enable enhanced conversions by checking the relevant box under Goals > Settings and accepting the Customer Data Terms. This feature uses additional first-party data, such as email addresses or phone numbers, to supplement GCLID data.
"Enhanced conversions for leads is an upgraded version of offline conversion import that uses user-provided data, such as email addresses, to supplement imported offline conversion data to improve accuracy and bidding performance." – Google Ads Help
Advertisers who combine first-party data with GCLIDs for offline measurement have reported a median 10% increase in conversions compared to those using standard offline imports. To use enhanced conversions, ensure all personally identifiable information is normalized and hashed using the SHA-256 algorithm before uploading. Automating this process is possible by implementing a Conversion Linker tag and a User-Provided Data event tag in Google Tag Manager. These tags capture GCLIDs and hashed lead data directly from your forms.
Once your Google Ads setup for offline conversions is complete, the next step is configuring Microsoft Ads for similar tracking.
Setting Up Offline Conversions in Microsoft Ads

Microsoft Ads has a process for offline conversions that's similar to Google Ads but comes with its own set of steps and tools. Here's how you can set it up, starting with creating a conversion goal and deciding how to upload your data.
Create an Offline Conversion Goal
To begin, go to Tools > Conversion tracking > Conversion goals in your Microsoft Ads account. Click Create conversion goal and select Offline as the conversion type. Choose a goal category that aligns with your business objective, such as Purchase for completed sales or SubmitLeadForm for capturing leads.
Next, configure the settings. Assign a goal name, define the revenue value (fixed or variable), and set the scope (Account or Customer level). For the count type, use All for sales or Unique for leads. You can also customize the conversion window, which can range from 1 minute to 90 days (129,600 minutes). Once you create the goal, MSCLKID Auto-Tagging is automatically enabled at the account level. Note that Microsoft Ads requires a 2-hour waiting period after creating the goal before you can upload conversion data, giving the system time to prepare.
Define Upload Method
After setting up the offline conversion goal, the next step is deciding how to send your data to Microsoft Ads.
There are three main upload options for offline conversions:
- Manual CSV Uploads: Go to Tools > Offline conversions > Uploads and upload a CSV file. This file must include the Microsoft Click ID (MSCLKID, a unique 32-character GUID), Conversion Name (set during goal creation), and Conversion Time in UTC format.
- Scheduled Uploads: Automate the process by scheduling uploads via Tools > Offline conversions > Schedules. This lets Microsoft Ads regularly pull a file from a publicly accessible URL, such as a Google Sheet published as a CSV.
- API or Bulk Service: For high-volume or real-time tracking, use the Campaign Management API or Bulk Service, which can handle up to 1,000 offline conversions per upload.
You can also use third-party tools like Nimbata or Attributer to automate the collection of MSCLKIDs and sync them back to Microsoft Ads.
Aaron Beashel, Founder of Attributer, explains:
Microsoft Ads' automated bidding strategies such as Maximize Conversions, Target CPA, or Enhanced CPC need at least 50 conversions per month to give the system enough data to learn what a good lead looks like.
If your sales volume is lower, consider using an earlier milestone, like "Qualified Lead", as your offline conversion trigger to meet this threshold. Keep in mind that it can take up to 6 hours for uploaded conversion data to appear in Microsoft Advertising reports.
Uploading and Managing Offline Conversion Data
After setting up your conversion goals in Google Ads and Microsoft Ads, the next step is to upload your offline conversion data. This involves formatting your data correctly and selecting an upload method that aligns with your business needs.
Format Data for Upload
To ensure your offline conversion data is accepted, you must follow specific formatting guidelines for each platform.
For Google Ads, acceptable file formats include CSV, TSV, or Excel. Key columns to include are "Google Click ID" (GCLID), "Conversion Name", and "Conversion Time". You can also add optional fields such as "Conversion Value", "Conversion Currency", and "Order ID" for tracking individual transactions.
In Microsoft Ads, the structure is similar but uses different column names, such as "Microsoft Click Id", "Conversion Name", "Conversion Time", "Conversion Value", and "Conversion Currency Code". A notable difference is that timestamps must be in Coordinated Universal Time (UTC), whereas Google Ads allows time zones to be specified either in a dedicated "Parameters:TimeZone" row or directly within the "Conversion Time" column.
For both platforms, ensure private data (like email addresses or phone numbers) is normalized (lowercased, trimmed of spaces) and hashed using SHA-256 for security.
According to Google Ads Help, advertisers who combine first-party data (e.g., email addresses, phone numbers) with GCLIDs often see a median 10% increase in conversions compared to standard offline imports. Keep in mind that Google Ads won’t process offline conversions uploaded more than 90 days after the associated click (or 63 days for enhanced conversions for leads). Microsoft Ads follows a similar 90-day window.
Once your data meets these requirements, you can proceed to choose the most suitable upload method.
Upload Methods: Manual vs. Automated
There are several ways to upload offline conversion data into Google Ads and Microsoft Ads, depending on your volume and technical setup.
- Manual Uploads: Ideal for low-volume needs or testing. Navigate to Tools > Measurement > Conversions (or Offline Conversions in Microsoft Ads), go to the Uploads tab, and upload your prepared file (CSV or Excel). If you're creating a new conversion action in Google Ads, wait 4–6 hours before your first upload to ensure the system is ready. Conversion stats typically appear within 3 hours for Google Ads and up to 6 hours for Microsoft Ads.
- Scheduled Uploads: A more automated solution for businesses without API access. Google Ads can fetch data directly from sources like Google Sheets, SFTP servers, or HTTPS URLs on a daily or weekly basis.
- API Automation: For high-volume advertisers or those needing real-time integrations, APIs provide the most control. Both the Google Ads API and Microsoft Advertising API allow you to push data directly from your CRM or server, eliminating manual uploads. Additionally, tools like Zapier offer a no-code option to connect your CRM with ad platforms.
| Method | Platform(s) | Best For | Technical Effort |
|---|---|---|---|
| Manual Upload | Google & Microsoft | One-time imports or low-volume testing | Low |
| Scheduled Sheets | Google Ads | Small to medium businesses without API access | Medium |
| SFTP/HTTPS | Google Ads | Businesses with automated reporting setups | Medium |
| API Automation | Google & Microsoft | High-volume advertisers or real-time needs | High |
| Third-Party (Zapier) | Google Ads | No-code automation for CRM and Ads | Low/Medium |
To avoid duplicate entries, Google Ads automatically filters data based on a unique combination of identifier, conversion name, and conversion time. As a best practice, include an extra day’s worth of data in each upload to capture conversions that occur close to the original click. Use the "All conv. (by conv. time)" column in Google Ads to confirm that your imports are working correctly, as it reports conversions by the actual conversion date rather than the click date.
Testing and Troubleshooting
Once you've uploaded your offline conversion data, it's important to ensure everything is working as intended. Google Ads offers an Offline Data Diagnostics Page, which provides a centralized hub to check your data quality score and review any alerts. This tool helps confirm that your uploads are processed correctly and flags issues before they can negatively affect your campaign.
Verify Data Accuracy
Start by ensuring your CRM is correctly capturing GCLIDs and MSCLKIDs. These identifiers are case-sensitive, meaning even small changes in their casing during storage or export can cause mismatches in conversion tracking. To avoid this, use hidden form fields on your landing pages to capture these IDs at the time of submission and store them alongside lead details in your CRM.
Google Ads evaluates data quality using four levels:
- Excellent: 90% or more valid events, no issues flagged.
- Good: 70–90% valid events, with minor improvements suggested.
- Needs Attention: Below 70%, which can lead to serious reporting problems.
- No Recent Data: No uploads in the last 28 days, requiring immediate attention.
For a quick health check, review the "All conv. (by conv. time)" column in your reports. This column shows conversions based on the actual event time rather than the click date, helping you confirm that your imports align with real-world activity.
| Data Quality Status | Match/Validity Rate | Impact |
|---|---|---|
| Excellent | ≥ 90% | Fully optimized; no alerts shown |
| Good | 70–90% | Healthy state; minor improvements suggested |
| Needs Attention | < 70% | Significant reporting impact; requires fixes |
| No Recent Data | 0% (Last 28 days) | Immediate investigation required |
Once you've verified accuracy, you can move on to addressing any timing or formatting issues.
Identify and Resolve Common Issues
Common problems with offline conversion tracking often stem from timing and formatting errors. First, ensure your conversion uploads fall within the platform's accepted time window. To minimize timing issues, schedule uploads 12–24 hours after the event. For businesses with longer sales cycles, consider tracking earlier milestones, like "Qualified Lead", to extend the conversion window.
Another frequent issue involves time zone mismatches. If conversion times appear to occur before ad clicks, you'll see "Invalid conversion times" errors. To fix this, standardize all CRM timestamps to UTC before uploading. For any personally identifiable information (PII), follow the normalization and hashing practices outlined in the Data Formatting Requirements section to maintain consistency and compliance.
Monitor Performance in Dashboards
After resolving errors, keep a close eye on your performance dashboards to ensure data quality remains stable. Both Google Ads and Microsoft Ads provide tools for ongoing monitoring. In Google Ads, hovering over the "Status" column in your Conversion Summary reveals a tooltip with detailed data quality insights and a link to further diagnostics. The History panel allows you to review trends either "By day" or "By job" to identify specific issues in individual upload batches.
Processing times differ by platform. Google Ads typically processes imports within 3 hours, while Microsoft Ads can take up to 6 hours. However, certain conversion types using GBRAID or WBRAID identifiers may require as much as 72 hours. If you notice "Unknown clicks" errors while using Enhanced Conversions for Leads, these often indicate organic conversions or leads from other channels that cannot be tied back to Google Ads. If this error appears consistently across all uploads, double-check your tag implementation and GCLID capture setup.
Conclusion
To implement offline conversion tracking effectively, start by enabling auto-tagging, storing click identifiers in your CRM, creating conversion actions, and consistently uploading conversion data. These steps help bridge the gap between online clicks and offline sales, offering measurable advantages for your business.
The results can be impressive. For example, in 2023, SaaS company Livestorm used offline conversion tracking to connect online engagement with offline sales meetings. This approach tripled their ROAS and improved their LTV:CAC ratio by 3x within a year. Similarly, Grayson Living, a furniture retailer, shifted their focus to optimizing campaigns for final conversions rather than clicks, achieving nearly 6x ROAS.
"Without offline conversion tracking, Google's automated bidding is optimizing for leads that fill out forms rather than leads that actually turn into high-value customers." - Amanda Pell, Content Creator, WhatConverts
Maintaining high-quality, consistent data is critical. Automate your uploads, follow strict formatting guidelines, and ensure your conversion windows align with your sales cycle (up to 90 days). Regularly reviewing dashboards will help keep your tracking accurate and actionable.
FAQs
What if my site strips the GCLID or MSCLKID on redirects?
If your website removes the GCLID or MSCLKID during redirects, it can interfere with offline conversion tracking. To avoid this issue, you can capture these IDs as soon as users land on your site. Use JavaScript to store them in cookies or local storage for safekeeping. Another option is to set up server-side tracking or a simple method to retain these IDs, ensuring accurate attribution for offline conversions.
How do I choose the right offline conversion event to upload?
When selecting offline conversion events, focus on customer actions that matter most to your business but occur outside the digital realm. These might include store visits, phone inquiries, or in-person purchases. The key is to pick events that align closely with your business goals, are easy to measure, and can be reliably connected to your online ad efforts. For instance, using identifiers like GCLID (Google Click Identifier) can help link these offline actions back to specific ad interactions.
To ensure accuracy, track actions through tools like your CRM or sales system. This way, you can clearly see how your advertising contributes to real-world results.
What causes 'invalid conversion time' or 'unknown click' errors?
Issues with offline conversion tracking often stem from problems with the imported data. Two common culprits are missing or incorrect click identifiers (like MSCLKID) and conversion times that fall outside the acceptable range.
To avoid these errors, double-check that click identifiers are correctly captured and accurately matched to the original data. Additionally, ensure all conversion times are valid and fall within the required timeframe. Proper data validation can save you from these headaches.